Overview
The Issuer system ensures TrueCreds issued to you are private, independently verifiable, and portable. To achieve these goals, we have engaged a new web-based technology called a Decentralized Identity, or “DID”. A DID, which represents your identity in an encrypted form, is a unique code stored on your personal web-enabled device that is only retrievable by you. Before you accept your TrueCred™, you must establish a personal DID during the Folio account registration process.
Note: If you have been through the process of accepting your TrueCred™, the DID was stored on the device you used at the time of initial registration.
If you are using another device or you have cleared your browser’s memory, you will need to restore your personal DID to accept a new badge. Click here to view the process for restoring your personal DID.
When you log into your Folio account from any device, simply use the email address and password you established on mytruecred.com during the registration process. If you have forgotten your password for your Folio account, click Forgot My Password on the Login screen.
What is a Decentralized Identity (DID)?
A Decentralized Identity (DID) is a unique code that represents a specific entity (person, place, or thing) most often used in credentialing so the entity’s credentials can be easily transported from one identity provider (e.g., TrueCred™ Folio) to another without needing to reissue the credential. Your DID is composed by encrypting the combination of an email address and a passphrase for security and to protect your privacy. The arbitrary email address and passphrase you use to create your DID cannot be changed once the identifier is created. Therefore, it is imperative that you remember the email address and passphrase you use because they are not stored on TrueCred’s system for your protection.
Why should I use a DID?
The DID is used to mask and protect your personal identifiable information (PII). The DID can be moved from one identity system to another. This enables you to store your TrueCreds with a new identity provider without the need for re-issuance.
Important Things to Remember About Your DID
Make sure you record the email address and passphrase for your DID in a safe, private location as they cannot be changed or reissued if lost.
Accepting Your TrueCred™
Below is the process for accepting your TrueCred™.
-
- When you receive an email welcoming you to the credentialing initiative, click the I want my TrueCred! link. Note: Save this email as you will need the Verification Code displayed at the bottom of to accept your TrueCred™.
- The TrueCred™ Folio page below displays. Enter a valid email address in the Email field and a password in the Password field. Enter the same password in the Confirm Password field.Enter your full name in the Full Name field and enter the handle of your choosing into the Short Name field.
Check the box next to Terms of Service to agree to the terms of service. Click Create Identity.
- Register your DID by entering a valid email address in the Email field and a passphrase in the Passphrase field. Enter the same passphrase into the Confirm Passphrase field. Click Register.
- Once the registration process is complete, you will be logged into your Folio account. You will not have any Accepted Credentials until you receive an email notification from the Issuer indicating that a TrueCred™ has been issued to you.
- You will receive an email from the Issuer when your TrueCred™ has been issued and is ready to be accepted. Click the link (“here”) in the email message body. Note: Save this email as you will need the Reference ID displayed at the bottom of the message in case you have any questions or problems with your TrueCred™.
- The official Issuer website will display. Click Login.
- The Credential Request Login popup box displays. Your DID should display. Click your DID and enter your secret passphrase into the Passphrase field as you did in above Step 3. If your DID does not display, follow the steps for restoring your DID below.
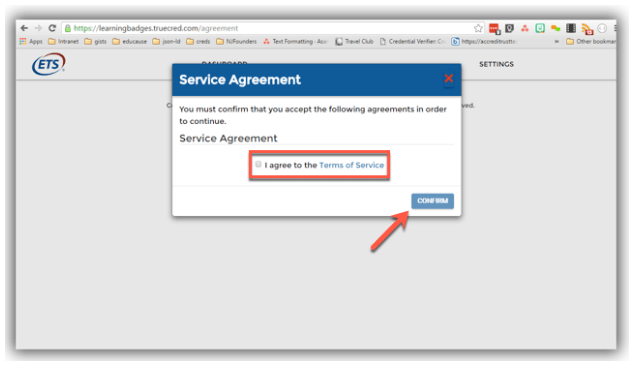
- Check the box to accept the Issuer Service Agreement and click Confirm.

